You just got home. Your new 3D monitor has just arrived on your doorstep and you are so excited to get started, you leave a path of cardboard, Styrofoam, and bubble wrap all the way to your computer room. You load up the software, get your favorite game started, and throw on a pair of 3D glasses. Then, without explanation, you are disappointed.
Where are the thrilling experiences you were promised? Where is that sense of depth? Where are the pop out effects and explosions? Is this product all it’s cracked up to be?!?
The answer is yes, and as hard as manufacturers are working to make stereoscopic 3D (S-3D) a customer friendly experience, there are some basic concepts every new S-3D gamer needs to understand to get the best results. These are very easy concepts to understand, and as long as you are aware of them, you will have an A-OK 3D experience!
At the most basic level, your brain takes a different image from each of your eyes and forms a stereoscopic 3D picture complete with volumetric depth. What this guide discusses is how to adjust the relationship of these images in your favorite video games so you can get the S-3D experience you are striving for.
The Possibilities
There are three types of 3D experiences you can aim for:
1. Depth 3D where you can see into the screen like a car windshield, but nothing ever penetrates the glass.
2. Pop-out 3D where things seem to fly out of your monitor’s window, but you see very little depth in the distance.
3. Depth 3D and Pop-out 3D where you benefit from both experiences.
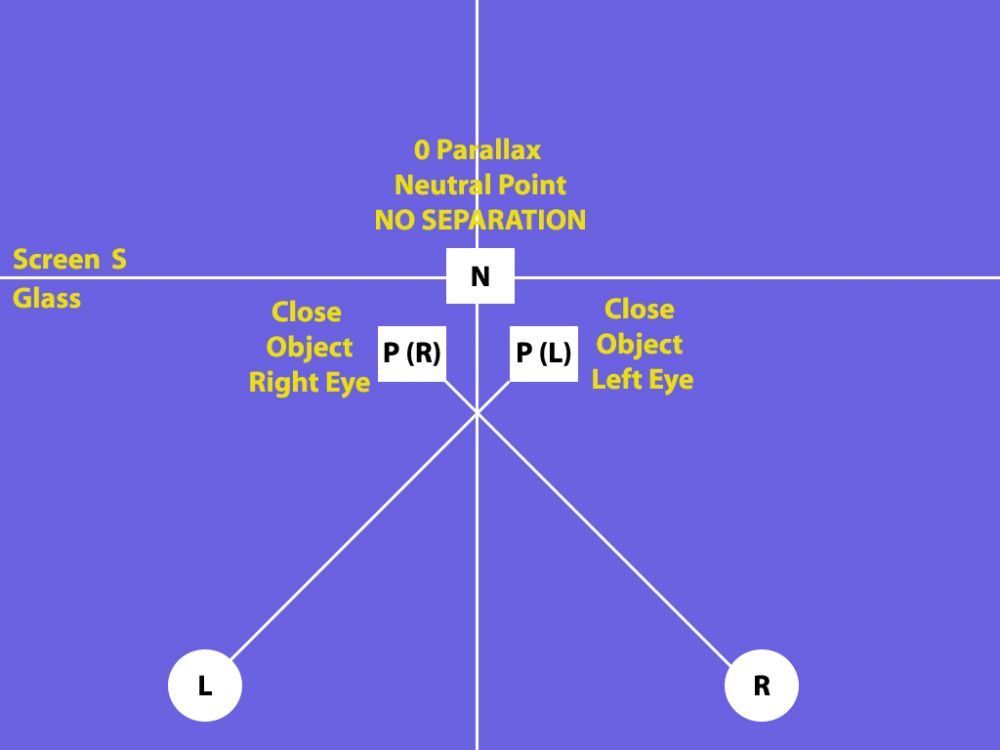
The Stereoscopic 3D Visual Map
Here is a top view diagram of how your eyes interact with a virtual 3D video game environment:
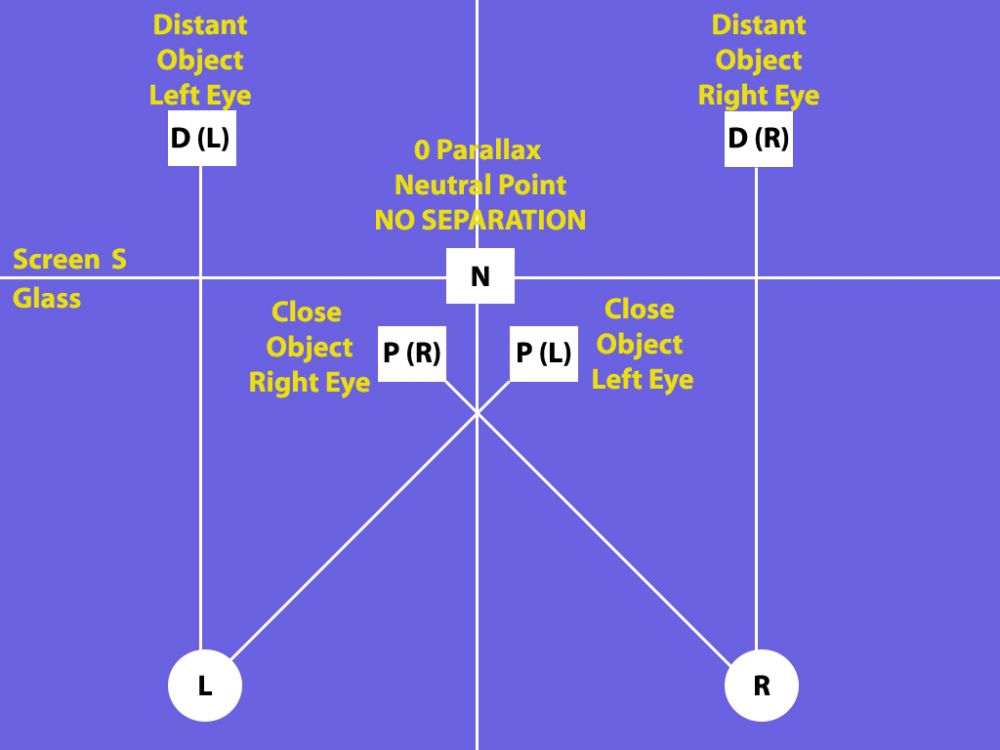
Circles “L” and “R” are your left and right eyes.
The “S” line is the virtual screen glass. Professionals call this “Zero Parallax”, but we will call it the “Neutral Point” because everything behind this position appears in the distance, and everything in front of it is an out of screen effect and will appear to pop out at you! Lots of fun! This is a virtual line and is not representative of your monitor’s physical screen location.
To make this easier to follow, symbol “D” refers to “distance”, and “P” refers to “pop-out”.
Let’s see how everything relates!
First, the boxes all represent the same object, but from different 3D perspectives. Remember that when you are wearing 3D glasses, your left and right eyes each see a unique 2D image, and your brain combines the two to create the 3D experience. This diagram is showing what things look like without the 3D glasses on so you can follow the relationships.
Box “N” is your object at the “Neutral Point” or “Zero Parallax”. If you were looking at this with your naked eye without 3D glasses, it would be a single box because there is absolutely no separation to create a 3D effect. If this was the only thing on the screen, it would appear to be 100% flat.
Box D(L) and Box D(R) is the same box with a space in the middle. This space is called “separation”, and the 3D distance is determined by the amount of separation between D(L) and D(R). If you were wearing 3D glasses, your brain would take these two images, consider the separation between them, and create a deep 3D experience for you.
Notice how D(L) and D(R) are aligned with your left and right eye? For the depth sensation to work, it is important that the image matches the eye that is seeing it. For example, if you open just your left eye, you will see D(L), and if you open just your right eye, you will see D(R).
It is important that the separation does not go beyond the actual space between your eyes or you will experience something called “divergence”, or encourage your eyes to point uncomfortably apart from each other. Also, the space shown in this diagram is exaggerated in two respects. First, the separation is usually no more than an inch to two inches apart for distant objects. Second, when the images have the same separation as the distance between your eyes, it is as though your are looking into infinity which is unlikely to happen in your video game experience.
P(R) and P(L) is also the same box, but if you were wearing 3D glasses, it would appear to be popping out at you! How is this feat accomplished? If you look at boxes P(R) and P(L), their perspectives are crossed from D(L) and D(R) – everything is opposite! If you opened just your right eye, you will see P(R), and if you open just your left eye, you will see P(L). In both cases, these are opposite perspectives of where your eyes are accustomed to seeing things.
Separation impacts this pop-out effect too, and the space between P(R) and P(L) tends to be less than D(L) and D(R) because the pop-out will be distracting and unattractive if overused.
When you are using your stereoscopic 3D solution, you will have the flexibility to choose where line S or “Zero Parallax” is so you can have the 3D experience that is right for you.
Games in Action
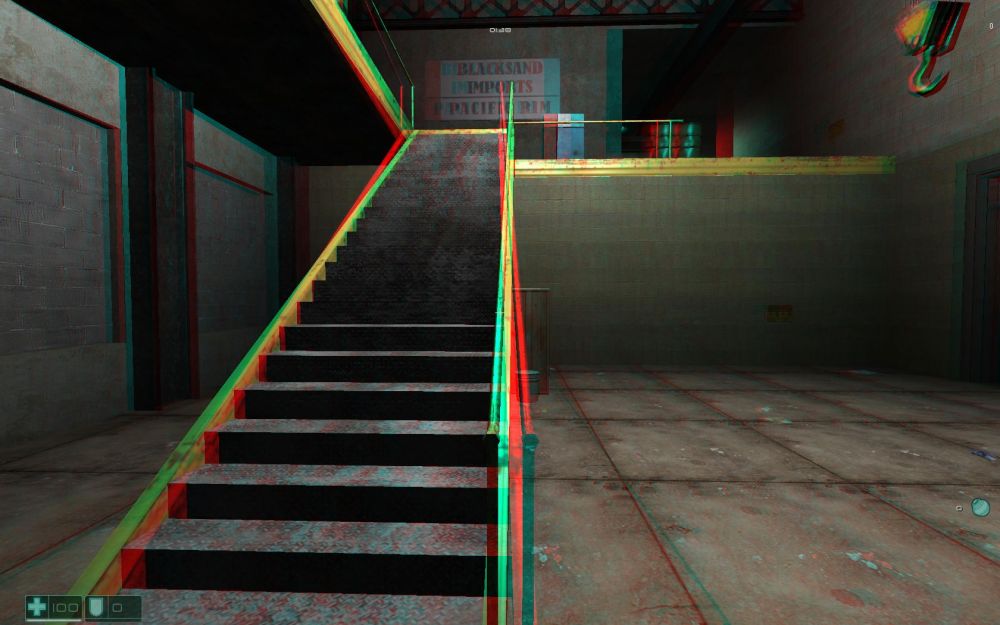
Let’s take a look at the three different 3D scenarios with actual video game images. There is a wide selection of far superior full color stereoscopic 3D solutions out there, but for our purposes, we are going to demonstrate these concepts using anaglyph red/blue images. With the colors, you will be able to see how the visual elements relate to each other.
In the case of anaglyph, the red side goes over your left eye, and the blue side goes over your right eye. The images are captured from Fear Combat by Sierra.
1. Depth 3D
Depth 3D is where you can see into the screen like a car windshield, but nothing ever penetrates the glass.
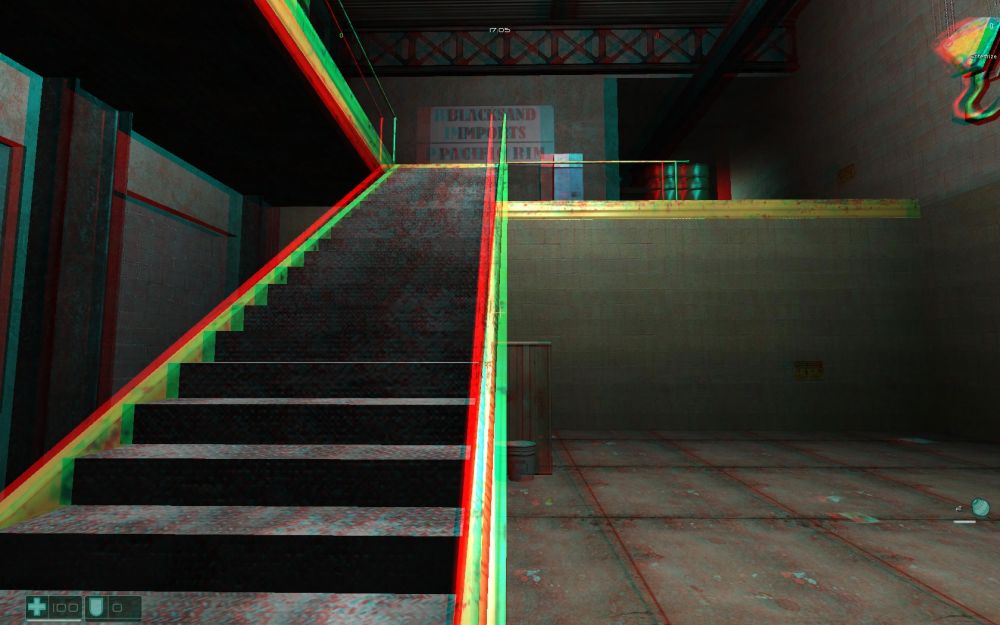
Look carefully at the staircase. Remember, everything in red is what your left eye sees, and everything in blue or with a blue tinge is what your right eye sees.
The further into the scene you look, the further apart the separation or the doubling is. Meanwhile, as the scene gets close to your personal space, the images join together. This is an example of a depth-only stereoscopic 3D experience.
Looking at the diagram, the back of the room is in positions D(L) and D(R), and the bottom of the staircase is in position N. Nothing goes beyond the S line which is why you don’t get the pop-out sensation.
2. Pop-out 3D
Pop-out 3D is when things seem to come out of the monitor, but the background is flat.
Look at the back wall on top of the staircase. There is zero separation in the distance, and therefore, there is no depth to be seen in the background parts of this picture.
Now look at the staircase. Notice how it separates more as the image gets close to you? Unlike the earlier photo which showed depth by having the red color on the same side as your left eye, this shows the red color on the opposite side where your right eye would normally be looking. This cross-eyed technique is what creates that pop-out effect.
Looking at the diagram, the entire background is in position N, and the remaining elements are in P(R) and P(L). This is a pop-out only scenario where the staircase seems to be coming out of the screen from an otherwise flat room.
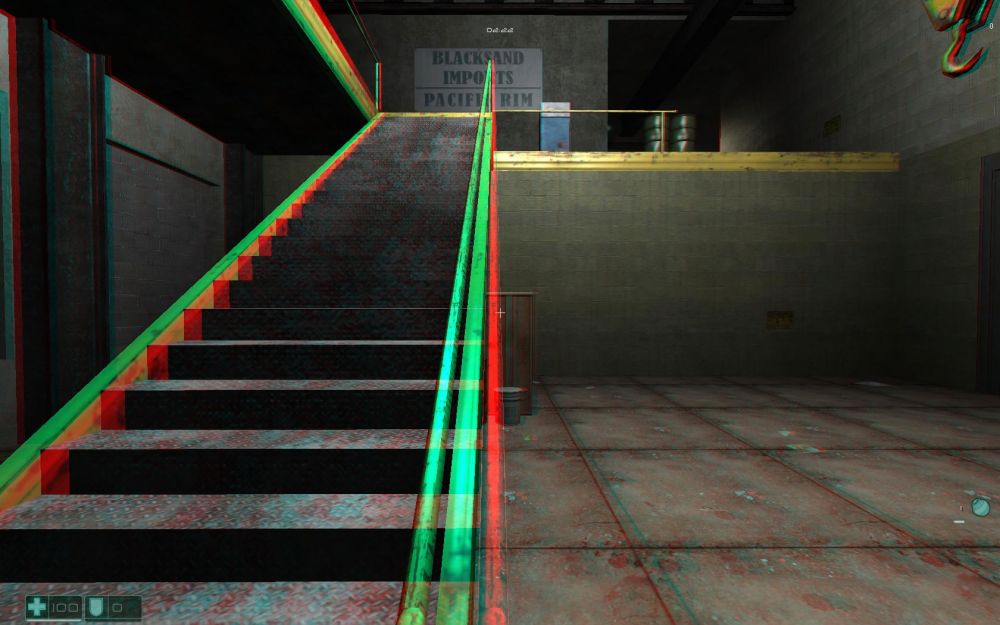
3. Depth 3D and Pop-out 3D
This is a scenario where you get a mix of both a sense of depth and a pop-out experience.
This image gives you the best of all the elements. If you look at the back wall on top of the staircase, there is separation between the images. The red is on the left, the blue is on the right, and this is in line with each of your eyes. This image will give you a sense of depth for the rear part of the scene.
Up close, the colors have switched over, and the red is on the right and the blue is on the left. This is the opposite of what your eyes are accustomed to seeing and this flip over creates the pop-out effect for the objects up close like the top of the banister at the bottom of the stairs.
Look carefully at the banister of the staircase very carefully. About halfway up, there is a cross-over point where the colors switch over. This crossover makes the banister look like an X. The center of this X is called “Zero Parallax” or what we called the “Neutral Point”. When you are adjusting your stereoscopic 3D experience, you can determine where that “Neutral Point” or “Zero Parallax” location will be, and this is done by adjusting something called “convergence”.
Looking at the diagram, the back of the room and top of the staircase is in D(L) and D(R). The middle of the “X” part of the staircase is on N. The bottom of the staircase is in P(R) and P(L). The staircase is an example of an object that crosses the “Zero Parallax” or “Neutral Point” threshold and exists in both plains.
How Separation & Convergence Interact
Now that we know how things look visually, the next step is to understand how to adjust the settings to your personal taste. In the previous section, we learned that “separation” determines the intensity of the 3D depth sensation, and “convergence” determines at what point the scene transitions from a depth experience to a pop-out experience.
We can simplify these terms even more. Think of separation as your depth budget, and convergence determines how much of that depth is spent on going inside the screen, and how much is spent going outside the screen.
The easiest way to adjust your stereoscopic 3D experience is without the help of 3D glasses. What you see determines how the 3D experience is going to look.
Here are three short video clips of how you can expect a modern game to appear with a stereoscopic 3D software solution. We are using Bethesda Softworks’ Oblivion as an example. The instructions presented here are generic, and we will have a more detailed setup guide for different software solutions at a later time.
Let’s begin with the premise that we have reserved enough separation or a “depth budget” to do as we please. The remaining variable is “convergence” or the location of the “Zero Parallax” or “Neutral Point” line.
Depth Only Settings
Let’s start with a zero convergence and put our neutral point where our monitor glass is located.
Look at the monolith in the center of the screen and the surrounding environment. Notice how everything is doubled at first, and as you walk toward the monolith, its separation gets closer and closer until it is completely joined. The point where the objects are joined is your “zero parallax” or “Neutral Point”. This is a depth only scenario where you will be able to see the distance into the screen, but nothing will ever penetrate the glass of your monitor.
Pop-Out Only Settings
Using our stereoscopic 3D driver software, we can move our convergence point very far into the screen. Let’s move it as far back as the mountains!
If you look at the video, the entire screen is a single image. However, as you walk towards the monolith, it starts to separate – not the other way around like with depth. The “convergence” or “Neutral Point” is no longer where your monitor’s glass is; it is deep inside the screen. This is how a pop-out only experience is organized, and as you walk closer to objects, they will breach your monitor’s glass, but the objects behind them will seem flat.
Depth and Pop-Out Mixed Settings
Instead of putting the convergence point very far in the distance, we are going to put it somewhere between our monitor’s glass and the mountains.
Look at the far back of the image with the hills and trees – everything has separation to it. Now look at the monolith again. As you walk towards it, it starts separated, completely joins together into a single image, and then begins to separate again. The point that the images completely join together is your new “convergence” or “Neutral Point”. In this case, the convergence point has been put behind the monitor’s glass, but close enough that you see both the depth and pop-out sides of the visual divide.
Conclusion
This guide is the first part of our series of articles on how to get the best experience out of your stereoscopic 3D solution. This guide is generic, but we will be developing additional articles that are solution specific. Post your thoughts HERE so we can revise this guide accordingly.
Read full article...